18/12/2024 – Quality management for high-quality round rod and bar
When vendors become partners
Round Ground Metal (RGM), a premier producer of close-tolerance, high-quality round rod and bar, and Magnetic Analysis Corporation (MAC) a global leader in NDT, recently joined forces to create a fully automated system that would enable efficient, high-quality testing of their stock for use in industries such as aerospace, heavy equipment, energy, and medical.
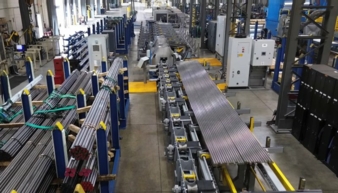
Together, RGM and MAC designed a system incorporating both eddy current and ultrasonic technologies to test cold-finished carbon steel, alloy, and stainless rod and bars. As Andrew Strzalkowski, the founder and President of RGM, stated, “We’ve always believed in working with suppliers at the earliest stage possible. The best results come when very specific needs are expressed and exchanged during the initial stages of design consultation.” Now installed by MAC, the massive system – more than 100-feet-long overall can test rods and bars ranging from 12’ - 42’ (3.66 to 12.80m) long and 0.75” to 3.5” (19.05mm – 88.9mm) diameter at speeds up to 150fpm (45.72mpm).
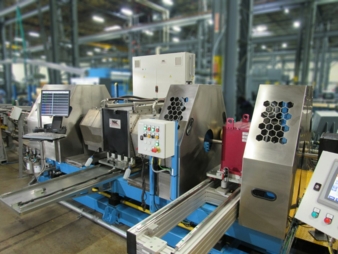
One of the earliest decisions made was to select an eddy current rotary probe tester. MAC’s 350 Rotomac used in this installation, is considered an industry choice for detecting longitudinal, seam-type defects, including cracks, pits, and laps. Operating at 150’ per minute this rotary can detect defects as short as 0.4” to 0.5” and, depending on material quality, defects smaller than 0.004” deep. At RGM, the current mill operation for uninterrupted testing flow is 120fpm, typically set up on 0.10” depth notches. To optimize the accuracy of the eddy current test, a demagnetizer removes existing magnetic fields in the bars that might counteract the fields induced by the eddy current probes during the test.
For detection of internal flaws, the Echomac FD-6 eight channel ultrasonic electronics and 100mm rotary were selected. Ultrasonic transducer test signals can penetrate the entire bar, allowing a 100% volumetric inspection to detect core internal flaws, such as cracks, voids, and inclusions, as well as some surface flaws. The rotary head mechanism spins the transducer elements and water couplant at speeds up to 2,400rpm around the bar as it is fed through the test. The transducers are housed in holders that facilitate set up for different sized materials.
Special attention was paid to the design of the automated handling system to prevent back-ups or jams, while promoting efficiency and accuracy. A conductor PLC with HMI touch screen controls all operations including rotary testers, triple guides, the bench, conveyors, sorting, marking and alarms. Bars ranging from 20 to 100 mm diameter are loaded from the input tables, with no size adjustment needed. MAC’s EZ drop rollers place the bar on the conveyor channel rolls where it moves smoothly through the testers. On the output side, tested bars are automatically sorted into accept or reject. Each accepted bar is lifted by sorting rollers and moves to an intermediate station to be raised by alignment rollers. The MAC Aligner unit, designed for this installation, pushes the end of the bar to line it up correctly before being released onto the accumulation table and into the accept pocket, making bundling much easier. Stops can be activated to accumulate bars while the pocket is emptied, without stopping the testing. RGM found these features particularly satisfying, as they enhance the bundling and packaging operation overall, demonstrating the benefits of the joint innovation between the two companies.
A new calibration station was designed to hold and feed reference bars used to verify tests are operating within specifications. In this system, a simple button press moves the bar from the calibration support station to MAC EZ drop rollers that catch the bar and lower it onto the inlet conveyor, where it is automatically fed through the testers, reversed and returned to the station. Calibration checks are usually done during setup, between bundles and after the production run. With MAC’s calibration station, this becomes a simple, efficient operation that avoids the wasted effort and inefficiency common in many mills where reference bars must be brought by crane from another part of the building every time a calibration is specified.
The relationship between MAC and RGM is a testament to what can be achieved when two industry leaders combine their expertise and resources. By leveraging MAC’s advanced NDT technologies and RGM’s commitment to precision and quality, the partnership has transformed quality assurance processes and ensured the highest standards in bar production. Dan Lawrence, President and CEO for MAC, comments, “Our relationship with RGM epitomizes MAC’s technique: we will actively seek out and solve difficult customer problems through a collaborative solution and focused approach that provides our customers with the lowest total cost of ownership available in the marketplace. This technique has served us well for nearly 100 years and we expect it to continue to serve us well for the next 100.”
Magnetic Analysis Corp
103 Fairview Park Drive
Elmsford, NY 10523/USA
Contact person is Jean R. Gould
Tel.: +1 914 5302000
jgould@mac-ndt.com
www.mac-ndt.com

