18/09/2020 – Tension measurement faster than ever before
Advanced stand-alone gauge head for quality control of optical fibers
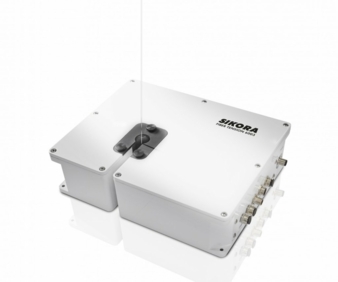
Tension has an important impact on the optical fiber quality which influences the uncoated fiber. Sikora AG has developed a stand-alone gauge head with a measuring rate of up to 10kHz that measures the tension quickly and highly precisely.
The fast, lossless transfer of data over long distances via optical fiber cables is essential for our increasingly digital and connected society. The future demand for optical fiber cables is further growing due to the global establishment and expansion of 5G wireless standards, increasing intra-data traffic within data centers as well as data traffic between different data centers. Visions of autonomous driving, vital functions monitoring IoT medical devices or smart cities with automated traffic management are only possible by establishing an infrastructure with widespread optical fiber networks. They enable an extreme high bandwidth and a constantly increasing intra-data traffic – permanent and in real-time. In order to ensure an optimal quality of the optical fiber, a variety of measuring and control technologies are already applied in the drawing process at different production stages. Tension has an important impact on the optical fiber quality which influences the uncoated fiber. SIKORA AG has developed a stand-alone gauge head with a measuring rate of up to 10 kHz that measures the tension quickly and highly precisely. Therefore, it is particularly intended for optical fibers which are further processed to premium optical fiber cables and for which specific requirements and standards exist. A gauge head with such a high measuring rate is especially suitable for fast control circuits.
Requirements for the manufacturing
In the course of rapidly growing worldwide networking, requirements on single-mode as well as multi-mode optical fibers with regard to their relevant parameters are ever increasing. Consequently, the tolerances for attenuation, loss and cut-off frequency as well as geometrical dimensions are continually getting tighter. The optical fiber manufacturers have to take the corresponding optical fiber specifications for the target application into account. Only then, they receive exact products that effectively fulfill the guaranteed durability. Therefore, a continuous online quality control during the entire drawing process is crucial.
During the different production stages, gauge heads and processor systems measure, monitor and control the entire drawing process to ensure the quality of the optical fiber and to increase the efficiency of the production process. The objective of optical fiber manufacturers is to control as many variables as possible in the drawing process to produce a fiber with a grade of high specifications as well as minimum scrap production.
For example, the diameter of the fiber is controlled over the line speed. When controlling one parameter, the thus influenced factors must also be monitored because all parameters in the drawing process are linked together. Hence, as the preform temperature increases, the viscosity of the optical fiber decreases.
When line speed and tension stay the same, consequently, the diameter decreases and scrap is produced or the fiber can even break. Therefore, for higher production line speeds at consistent tension, the preform temperature is being increased. On one hand, the tension must be controlled to prevent fiber breakage. On the other hand, the controlled tension guarantees that important parameters of the produced fiber as, for example, the cut-off frequency of the attenuation parameter comply with the set specifications.
Based on the birefringence principle
There are different methods for tension measurement available on the market. One of these is the traditional vibration measuring method where a gauge head is used for the measurement of the diameter as well as the vibration of the optical fiber in the drawing process and thus determines the tension. There is no distinction between natural and forced vibration of the fiber, whereby measuring inaccuracies may occur due to stronger external environmental influences. The application of such a dual measuring system is beneficial, for example, when a lack of space in the drawing tower makes the installation of multiple stand-alone gauge heads difficult.
Sikora AG offers a new technology for a highly precise tension measurement in a stand-alone system. This is based on the birefringence principle that uses the direction-dependent refractive characteristics of glass which occur when forces act on the glass. A light source sends polarized light that travels through the optical fiber. Due to the direction-dependent refraction index, a change of the original polarization occurs. The exiting double refracted light is received by a detection unit. This determines the difference of the polarization of the received light to the original polarization of the light source. This difference is seen as the measure for the tension exerted on the optical fiber (fig. 1). The self-sufficient stand-alone measuring system offers an even more resilient and precise tension measurement for the validation as well as for the faster control of this eminently important parameter. This is achieved by the innovative measuring principle and the considerable measuring rate of up to 10kHz. The measuring area of the system is up to 400g and the reproducibility amounts to ± 0.1g.
Use of the systems and application area
The gauge head can be either installed before or after the cold position of the uncoated fiber. The measured value is independent of production influences such as the position of the fiber in the measuring field, the production line speed as well as the vibration or oscillation of the fiber. Therefore, the gauge head can also be used for statistical offline measurements if needed. For example, the calibration of the system can be checked easily by using test probes. The system generates reliable and stable measuring values and thus enables an immediate control of the tension. The installation in existing drawing towers is possible at any time. The application of the described stand-alone gauge heads is particularly attractive for manufacturers who want to receive highest quality due to an optimal production process with minimal scrap and at smallest possible resource usage.
Visualization of the measuring data
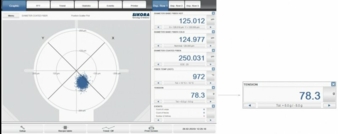
The tension gauge head is available with all common interfaces and industrial field busses, for example, Profinet IO, EtherNet/IP or Profibus-DP. Therefore, digital or analogue data transmission is available depending on the requirements of the customer. Additionally, the gauge head can be connected to a processor system that is also available. The processor system provides further interfaces such as OPC UA and visualizes the production data. It is possible to display single measurement values, for example, for the analysis and optimization of processes. Furthermore, the measuring values of the tension gauge head can be merged with values of other measuring devices, such as diameter measurement values. Due to the combined evaluation, the so-called sensor fusion, plausibility and significance of the recorded data are being increased and the quality of the measuring results is further improved.
Further available measuring and control technology
In addition to the stand-alone device for tension measurement, Sikora offers systems for the measurement of the diameter and the position of the uncoated and coated fiber, which also determine the tension via vibration measuring method. Further gauge heads measure and control in combination with a processor system the temperature of the optical fiber at the hot and the cold position of the drawing process. Gauge heads for the detection of airlines, for the measurement of the concentricity of the coating and for the detection of lumps, neckdowns and blisters on the surface of the coated fiber complement Sikora’s portfolio for the quality control of optical fiber.
Conclusion
In order to establish a sustainable infrastructure sufficient for the needs and requirements of our ever increasing digital society, the quality of the optical fibers used and thus the optical fiber cable is crucial. The measurement and control of the tension in the drawing process has a direct and significant impact on the product quality. The stand-alone gauge head developed by Sikora uses a technology which applies the birefringence principle with an impressive measuring rate of up to 10kHz. This enables an even faster and highly precise tension measurement that is independent of outer production influences and allows for immediate control of the tension. Necessary specifications are fulfilled and the high grade of the fiber is guaranteed. Therefore, the system contributes significantly to highest and reproducible quality. Additionally, it lays the foundation for an efficient and future oriented production.
Rebecca Zachau, Sikora AG
wire China 2020, booth W1E11
Sikora AG
Bruchweide 2, 28307 Bremen/Germany
Tel.: +49 421 48900-0
sales@sikora.net
www.sikora.net
About the company
Sikora AG was founded in 1973 and is today a leading global manufacturer and supplier of measuring and control technology for the wire and cable, hose and tube, sheets as well as optical fiber, metals and plastics industries. With around 300 employees worldwide, 14 international offices and more than 30 regional representatives, the company provides customers with innovative product solutions and individual service. The measuring and control systems are exclusively made at the headquarters in Bremen/Germany.

